I know, I know. Every blogger in the strength and conditioning realm claims to make the best scrambled eggs. There are already a zillion blog posts about scrambled eggs, but, to be honest, finals week is bearing down on me and I am a little short on time right now. Despite the cliche nature of this post, you will:
Learn how to make some stellar scrambled eggs, and
Get a couple of my thoughts on nutrition.
I am in no way, shape, or form a nutrition expert. However, in my ongoing quest to become a strength and conditioning expert (which I also don't claim to currently be), I have read through more nutrition information than the average person. I know how to eat "healthy", and I have come to understand the more practical aspects of eating to support heavy lifting that the muscle mags neglect to mention. I have also had to unlearn a lot of the things that bodybuilding nutrition articles led me to believe, and I hope that I can help some younger lifters learn from my mistakes.
Bacon and sausage optional, but recommended (especially for younger lifters)
10 Steps for Delicious Scrambled Eggs
1. Put your pan on the stove and turn the burner on to medium-low heat. The burners on my stove go from 1 to 10, and I am always in the 3.75 to 4 range. Do not cook on heat higher than medium-low, as your eggs will cook too quickly and you will have to stir too much to prevent them from browning.
2. Next, crack your eggs into a separate bowl. Try not to make the rookie mistakes of using a bowl that is too small or allowing small pieces of shell to get mixed in with your eggs (duh).
3. Whip the eggs up until they are a light yellow color. Do not only stir a couple of times to break the yolks; whip those eggs up for a solid 30+ seconds so they are a light yellow color.
4. After getting the eggs all whipped up, add a little bit of cold water to your eggs. I once read that adding water makes for fluffier eggs that are not excessively moist. Adding milk, on the other hand, makes for fluffy and moister eggs. I prefer my eggs to be less moist, so I always go with the water. I don't add much, just a quick spritz from the sink. After adding the water, I make sure to give the eggs a couple more quick spins in order for the eggs and the water to mix.
5. By now your pan should be ready to go, so it is time to add butter to the pan. I usually cut a fairly thin slice of butter, as it doesn't seem to take much to work its magic. If, when you put the butter in the pan, your butter melts quickly and browns, your pan is too hot. Cooking eggs with a pan that is too hot is a sure-fire way to make terrible scrambled eggs. Should your pan be too hot, dump the burned butter, turn down the heat slightly, and give the pan a couple minutes to cool off before you try again. Trying to rush the process is not worth it. Trust me, do it right.
6. Okay, your butter didn't burn and you are now ready to add the eggs. Pour the eggs into the pan. Nice work.
7. Here is one of the most important points: do not stir the eggs too much! Do not constantly stir the eggs; instead, let them sit and only scrape the cooked egg from the edges of the pan to the center of the pan. Do this every 30 seconds or so when you first add the eggs, and then more frequently as the eggs progressively become more cooked. As the eggs begin to solidify, keep scraping to the middle and then tilt the pan so that the uncooked liquid egg runs to the perimeter of the pan.
8. You scraped the cooked egg on the edges to the middle and now you are left with a mass of cooked egg in the center of your pan. Because I like my eggs to be a little drier, I flip my mass of eggs over to cook the top of it. But, if you are a fan of moist eggs, you can probably skip that part.
9. This last part is optional, but recommended. Top your eggs with some shredded sharp cheddar cheese, a dash or two of salt, and a couple shakes of pepper. You can really add anything else you like, but those three things are easy and make your excellently cooked eggs even more delicious.
10. Eat.
Like this crocodile, you will be salivating
Now, a couple of thoughts. First off, I wouldn't be surprised if some readers are offended by the suggestions of adding butter, salt, and cheese. When I was younger and more impressionable, the muscle magazines tricked me into thinking that I had to avoid these things if I wanted to get huge/jacked/ripped/yoked. So, as a 6 foot, 155 pound kid (skinny, really skinny), I would go out of my way to not have extra butter or salt, cheese, pastas, breads, potatoes, and a number of other foods. Because of this stupidity, I completely squashed any chance I had at getting bigger and stronger in high school. I distinctly remember adamantly refusing a chocolate chip cookie after a JV basketball game while I watched one of my teammates, who, as a sophomore, was the starting middle linebacker on our varsity football team (and, at this time, could bench 225 for about 15 reps), consume a couple of cookies. At the time, I just didn't get it. I was eating "clean" and lifting consistently, but I was not getting results. Meanwhile, this guy seemed to be much less stringent with his eating, and he was an absolute beast. Sure, genetics play a role; but that is not the point. The point is, if you are a young, skinny, weak kid, JUST FREAKING EAT! I am not saying that you should be eating a bunch of cookies, but you should be less concerned about what you are eating and more concerned about how much you are eating. Surely a high schooler is going to use that sentence as an excuse to eat nothing but chips, fries, Gatorade, and ice cream, so I need to give a disclaimer. Eat a lot of good food. What is good food (in this skinny kid context)? Anything that isn't some sort of dessert. You have a general idea of what "good" food is and what "bad" food is. Think logically and not too restrictively in order to take advantage of this prime growth period.
Senior year of high school. I probably would have broken this tackle if I just ate the freaking cookie
With that little spiel out of the way, I also want to highlight a couple of eating pointers for college-aged lifters. The most important thing lifters in this category can do is learn the basics. I don't mean learn the lifting basics (although you should be doing that, also), but the cooking basics. Learn how to cook some good scrambled eggs (see above). Figure out how to grill a nice piece of steak and a tasty chicken breast. Be able to cook up some baked potatoes.
The basics.
I could go on, but you get the point. It is difficult to get big and strong if you suck at cooking. Sure, you can always get take-out, eat dining hall food, or just eat the poorly cooked food that you can make. But, at some point you are going to have to learn to feed yourself, and you might as well get good at it. It is much easier to eat a lot of well-cooked food than it is to force-feed yourself dry, burnt, disgusting food. Trust me on that one. Learn to cook, your lifts will thank you. Also, and this point can apply to anyone that has trouble gaining size and strength, you need to develop a lifter's appetite. Being a naturally skinny kid, I always had trouble eating enough food. I was always the kid who would only have a couple of slices of pizza and would get a doggy bag for the second half of my burger. I had a tendency towards smaller portions and ceasing my food intake before I was full, Those are good traits for overweight people to develop, but they are not conducive for making skinny kids less skinny. I overcame this tendency by serving myself more food and then eating everything that was on my plate. Simple, yes. But, if you are not a big eater, you are going to have to do something like that to address that issue. It isn't hard, but it will take some conscious thought and effort.
That's it for this week. If you have any thoughts on cooking or eating for lifting, don't hesitate to share them below. Also, if you have any questions about this, or any previous article, feel free to comment or contact me on Facebook or at amcgunagle@gmail.com. Thanks for reading!
What is the easiest way to get better at something? Identify your weaknesses and address them. In powerlifting, where getting better equates to being able to lift more weight, the formula is the same.
Addressing weaknesses is nothing new or revolutionary when it comes to powerlifting. Lifters have been deliberately targeting their weak muscle groups for many years. Furthermore, in the past couple of decades, lifters have been taking aim at weaknesses, also known as "sticking points", within their squats, benches, and deadlifts. These lifters will identify where the bar slows down or stops during a maximal attempt, and they will do various exercises that build strength in the weak areas of their range of motion. This method is effective because strength is joint angle specific; the maximal amount of force that can be exerted in a particular lift changes as a lifter moves through the range of motion and the orientation of their limbs change. This is due to various neuromuscular and biomechanical factors, but the big take away is this (quoted directly from Zatsiorsky's "Science and Practice of Strength Training"):
"Strength values at the weakest positions, or the so-called sticking points, are also very important. The heaviest weight that is lifted through a full range of joint motion cannot be greater than the strength at the weakest point."
Make sense? You cannot lift more than the amount of weight that you can lift at the weakest point of your lift. So, if you can bench 315 pounds at every joint angle except the bottom two inches, where you can only bench 295, then you are only going to bench 295. Using this simplified example, what would be the quickest way to take your bench from 295 to 315? Simply do exercises that target the bottom two inches of your bench, where you are weakest. With these thoughts in mind, let's get to the meat-and-potatoes of this article.
Weakness Identification: Version 2.0
As I alluded to previously, lifters have been been doing their best to identify the weak areas in their ranges of motion for some time now. While many lifters have done this successfully, there has to be a more precise way to do this than simply looking at a max attempt and guessing where you are weakest.
Enter, Tracker Video Analysis and Modeling Tool.
Tracker is a free computer program often used in physics courses to analyze various aspects of an object's motion. This software allows the user to select an object of interest in a video and then it can provide a bevy of information about that object's movement. What does this have to do with powerlifting? Well, all you have to do is take a video of a 1-RM lift and then designate the weight you are lifting as the object to analyze. After the analysis, Tracker can give you information about the weight's velocity and acceleration, and this information can be absolutely invaluable in guiding your upcoming training for that lift.
Before I go any further, I have to stop and give credit where credit is due. I first learned about Tracker from Mike Tuchscherer on his Reactive Training Systems website. Mike introduced the software on his forum, and he, along with a number of other lifters, helped me learn how to use the software for analyzing lifts. Much of the information that follows originated from Mike T., and I highly suggest checking out his website and his products for further information on this topic.
This stuff seems to work for Mike
Alright, getting back to Tracker and identifying weaknesses, I think that a few visual examples will be the most effective way to go about this. The following videos and analysis stills that accompany them show some old meet footage of Eric Cressey. These videos work well for analysis, as the software is more accurate when there is less camera movement and there is a consistent portion of the barbell to track. Also, the lift has to be a maximal attempt (or as close to maximal as possible) to give relevant information.
The first video and two analysis stills shows Eric's successful second attempt deadlift with 650 pounds:
Beginning of weak ROM (about 7.5 from the start of the lift).
End of weak ROM (about 13.4 from the start of the lift).
The second video and analysis shows Eric's third attempt miss with 661 pounds:
Analysis paused at weak point (about 7.5 inches from the start of the lift).
This is where the fun begins.
In each Tracker analysis, you see two graphs. The x-axis of each graph is for the movement of the point of analysis (in this case, the barbell) in the y-direction (up and down movement). The y-axis of the top graph denotes acceleration in the y-direction, while the y-axis of the bottom graph denotes velocity in the y-direction. For each analysis, our only concern is the concentric portion of the lift in the y-direction. Movement in the x-direction (side to side movement) doesn't matter; all we are looking at is the weight as it is lifted up.
So, what Tracker does is track the weight from frame to frame in the video, and this gives information about the acceleration and the velocity of the weight. The most important information that we get comes from the weight's acceleration throughout the lift. This is due to Newton's second law of motion:
Considering that force equals mass times acceleration, and that, while lifting, the mass we are lifting is constant, we see that the force we exert during the lift depends on the bar's acceleration. So, looking at the top graph of the Tracker analysis, we look for the lowest acceleration value. The lowest acceleration value is where the lifter is producing the least amount of force. This point, where we see the lowest acceleration value(s), is the lifter's weak point.
Remember, though, acceleration is a change in velocity (speed) of movement. So, while many lifters have mistakenly believed that their weak point is where they are slowest or where the bar gets stuck, it is actually where the bar is slowing down the most. This is an important distinction, and it highlights the power of this video analysis software. With Tracker, we can determine where the lowest acceleration is with much more accuracy than we could if we just watched the lift and guessed. Looking at the analyses of Eric's deadlifts offers an interesting example of Tracker's utility.
While there is some "noise" in the graphs, it is fairly simple to identify the weak points in Eric's deadlift. Zooming in on the acceleration graph for his 650 make, we see low acceleration values right around 0.2 on the x-axis:
While there are a couple of other low acceleration points at about 0.35 and 0.55, the value at 0.2 is notable for a couple of reasons. First, that value is followed by a couple more points of deceleration; this shows a trend of weakness in that area. Also, looking at the velocity graph, we see that this deceleration correlates with a distinct drop in velocity:
Using the diameter of the plates as a reference value, Tracker allows the user to measure and pinpoint where the weak point is. In Eric's case, his weak point is about 7.5 inches from the start of the lift (measured from where the bar is when the weight is on the ground to where the bar is at his weak point). We can also identify a weak range, which would go from that weak point at 7.5 inches all the way up to about 13.4 inches from the start of the lift. Also of note, in the second video that shows his miss, his weak point was just about at the same spot. Looking at the analysis stills, which are paused at his most prominent deceleration values, you can see that the weak point is very consistent. This leads you to believe that, if Eric had been able to produce more force at that spot 7.5 inches from the start of the lift, his velocity would not have dropped off so much and he would have had a much better chance of making that third attempt lift.
Weakness Diagnosis and Training Prescription
Without the knowledge of the relationship between force and acceleration and the ability to pinpoint the point(s) of lowest acceleration, many coaches and lifters might have advised Eric to improve his deadlift lock-out. After all, if you look at that second video, you see that he got stuck right before finishing the lift. However, this would have been an ineffective diagnosis and prescription, as the point in the range of motion that was holding Eric back was 7.5 inches off of the floor (and, looking further, he could use work from that point all the way to about 13.5 inches off the floor). If Eric could improve his ability to produce force at the point in the lift, his 1-RM would likely increase. Therefore, special exercises that would likely address this issue include pause deadlifts (with the pause occurring as close to 7.5 inches off of the floor as possible) and deadlifts where the bar is positioned 7.5 inches off of the floor (either on blocks, mats, or in a rack). The rationale behind pause deadlifts is that spending more time under tension at the weak point in the lift would influence the body to improve strength at that point. If you have never seen pause deadlifts, here is an example (fast forward to the 50 second mark; the pause in the video isn't that high, but you get the idea):
Elevated deadlifts, whether done from blocks, mats, or in the rack, force the lifter to accelerate the barbell from their weak point instead of relying on the force that is generated in the preceding range of motion. When lifting sub-maximal weights, the acceleration of the barbell can be great at the beginning of the lift, while the rest of the lift is "partially fulfilled via the barbell's kinetic energy" (Zatsiorsky). So, when training, instead of producing a lot of force at the start and coasting through his weak range, Eric would be forced to accelerate the bar from the beginning of his weak range of motion. Need an example? Konstantinovs:
In addition, looking at the overall shape of the force (acceleration) curve gives some important information as well. Mike Tuchscherer likes to classify force curves as being more "flat/balanced" or more "wedge" shaped. However, these classifications are not black and white, as a lifter can be in between these two ends of the force curve spectrum. A flat/balanced force curve shows acceleration values hovering around zero; the lift was fairly smooth throughout. A wedge shaped force curve shows a distinct sticking point; the lifter hit a slow grinding point while the rest of the lift is fairly smooth. Looking at the analysis of Eric's deadlift, though, I would be inclined to say that his deadlift is more or less in between flat and wedge. His acceleration values hover around zero, but we do see a significant deceleration that leads to a notable drop in velocity.
For flat force curves, the lifter would focus on protocols that improve their ability to produce force. These protocols would look similar to the dynamic effort method, essentially speed and power work. The lifter would focus on sets of 1-3 reps with RPEs of 7-8. As a rule of thumb, reps should be smooth and fast when addressing a flat force curve (but that doesn't necessarily mean the weights should be "light").
On the opposite end of the spectrum, the standard recommendation for lifters with wedge shaped force curves include sets of moderate reps with higher RPEs. Protocols with sets of 3-5 reps with 9-10 RPEs fit the bill here. The rationale behind this type of training is that these protocols force the lifter to spend more time at their weakest joint angles. With these protocols, speed drops off as you progress towards the final reps of each set, and you are forced to grind through your weak spots. This type of training helps to strengthen the lifter's weak points while simultaneously improving their ability to grind through them.
No, not this kind of wedge.
Because Eric is more of less in between when it comes to force curve shape, we can get a little creative and use a variety of protocols. What protocols we employ and when we employ them would depend on how we choose to arrange his training cycle. However, exercise selection would aim to consistently address his weak points while maintaining a certain amount of specificity. Options include:
Belt-less deadlift: Earlier in the training cycle, 3-5 reps with 9-10 RPEs.
Competition deadlift: Transition from belt-less to competition style as competition or test date nears, protocols would be used to translate improvements from less specific exercises and protocols into sport-specific gains, low reps (1-3) with high RPEs (9-10).
Pause deadlift: Throughout training cycle, pause about 7.5 inches from the start of the lift, shorter pauses (1, 2, or 3 counts) with moderate reps (2-4) early in cycle, longer pauses (5, 7, or 9 counts) with lower reps (singles) later in training cycle.
Elevated deadlift: Varied, elevate the bar about 7.5 inches from its normal resting point, moderate reps (3-5) and various RPEs (8-10) earlier in cycle, low reps (1-3) and higher RPEs (9-10) later in the cycle.
Deadlift vs. bands: Used earlier in the training cycle, 1-3 reps with 7-8 RPEs, try to set up bands so they really kick in at the weak range of motion.
Wrap Up
Identifying and addressing weak points can lead to significant improvements in your ability to lift more weight. The trick is to identify weak points accurately and then utilize targeted exercises and protocols to take care of those issues. I did my best to introduce you to a more sophisticated method of identifying weak points, but, in all honesty, I am just scratching the surface of this process. I encourage those that are interested to download Tracker and play around with it. Also, be sure to check out Mike Tuchscherer's Reactive Training Systems website, as he is offering incredibly detailed Individual Weakness Analyses and is championing this new-school analysis approach. If none of that interests you, at least remember this: Your weak point/weak range of motion is not where you are slowest or where you stop, but where you slow down the most. Identify where you slow down/stop and then work on the area slightly lower than that. That is not the most accurate method of addressing weaknesses, but it should be more effective than what most lifters are currently doing.
That's it for this week, thanks for reading! Be sure to leave any questions or comments in the comments section below or contact me at amcgunagle@gmail.com
In the words of Napoleon Dynamite, "Girls only want boyfriends who have great skills!"
Yes, great skills can lead to many advantages in life; and the gym is no exception. While you might mistakenly believe that lifting weights is just about brute strength and sheer force of will, lifting skill is nevertheless an important factor in the training process.
To make this point clearer, let's think about the similarities between throwing a baseball and lifting weights. It would be difficult to find someone who wouldn't agree that throwing a baseball is a skill. Throwing a baseball takes time to learn; Tim Lincecum wasn't winding up and blazing fastballs by batters from the moment he first picked up a baseball. Finding the most efficient and effective throwing motion is a process, and it is a process that can be advanced by instruction, thought, and practice. The most advanced throwers in the world, guys like Lincecum, Roy Halladay, and Justin Verlander, are examples of individuals that have mastered the set-up and the execution required to achieve highly skilled performances in their sport. What does this have to do with lifting? Well, just look at the best lifters in the world; the majority of these guys are absolute technicians when it come to the actions of their sports. Watch a guy like Mike Tuchscherer squat (first video below), or an O-lifter like Pyrros Dimas perform the snatch and the clean and jerk (second video below). These guys are prime examples of highly skilled lifters, and you better believe that that skill is a vital component of their lifting success.
Perfect practice allows for perfect performance, but what should you practice? What, as a lifter, are the things that you should be able to do? In my list below, some of the points refer to lifting basics, others acknowledge subtleties that I see many lifters ignore, and a couple point out things that I simply don't like to see in the weight room. All of these points can improve your safety and your performance in the gym.
So, without further ado, here are the 10 things (I believe) every serious lifter should be able to do:
1. Be able to maintain a neutral spine: Learning to adopt and maintain a
neutral spine position is probably the most important thing you can do
as a lifter. I am sure that most of my readers know what I mean by "neutral spine", but, for those who don't, a neutral spine position is the natural position of the spine. In this position, there are three natural curves in the spine, as seen below:
The trick is to be able to maintain this spinal positioning when the torso is inclined at a variety of angles in conjunction with various degrees of hip and knee flexion. Furthermore, this task has to be completed while heavy weights are doing their best to make your spine look like an inverted-U. Whether you are in the starting position for a deadlift, at the bottom of a squat, doing a bent over row, or doing single leg movements, you must do your best to maintain this position. Common cues to help lifters maintain a neutral spine include: "puff your chest up and out", "squeeze your chest out", "tuck in the low back", "brace your abs", and "get tall". Deviating from this neutral position under a load subjects the vertebral discs to much higher stresses, and I simply cannot in good conscience recommend heavy lifting with sub-optimal spinal positioning. Sure, there are successful lifters who lift with rounded backs. Also, it is nearly impossible to maintain a perfectly neutral spine position during a maximal lift. The two things to keep in mind, though, are, 1) rounded back lifters seem to be the exception rather than the rule. and 2) being unable to maintain a neutral spine when lifting sub-maximal weights does not bode well for the long-term health of your spine. If you want to lift big weights for a long time, then always do your best to adopt a neutral spine position.
2. Be able to stay on the heels/mid-foot: Whenever I work with athletes, I always
make sure to tell them that sports are played on the balls of the feet,
but lifting is done on the heels (or, as is
the preference of some lifters, the mid-foot). If you have ever played too much
pick-up basketball or tennis without being adequately prepared, you
probably understand that combining high forces on the forefoot with
hard surfaces usually leads to sore knees. In the weight room, combining
anterior weight shift, heavy loads, hard surfaces, and repetitive
movements is the perfect recipe for anterior knee pain (pain just below
the kneecap). This is one of the main reasons why nearly every lift
requires the lifter to keep their weight back on their heels in order to achieve
maximum safety and performance. Not only do lifters need to keep their
weight on their heels, but they must understand how to push their heels
down into the floor. Driving down into the floor helps you drive the
weight up; it really is that simple.
Left foot = sports, right foot = lifting.
3. Be able to hip hinge: The hip hinge gets a lot of love these days, and for
good reason. Knowing how to achieve this position is vital for the
proper execution of a number of posterior chain exercises. The hip hinge
can be summed up as follows: weight back on the heels/mid-foot, shins close to being vertical, femurs angled back, torso inclined forward while
maintaining a neutral spine position, and chin tucked/neck packed.
The hip hinge is just your basic RDL, it has been around for years.
You
will know that you are hip hinging correctly when you feel tension in
the hamstrings in that position. The basic hip hinge is simple, but many
people struggle with it. The majority of people have spent the bulk
of their lives flexing at the spine whenever they need to bend over.
Other individuals are unable to distinguish between a squat and a hip
hinge, and they tend to let their knees drift forward while keeping
their torso upright when attempting to hinge. When first learning how to hip hinge, pushing into the tension of your hamstrings feels strange and uncomfortable. Everyone is so used to moving from the body segments that feel loose and free (the lower back and the knees), that sitting back with the hips while keeping the lower back stiff and the shins vertical presents a unique challenge. If you have never hip hinged or if your hinging skills are sub-par, practicing the hip hinge is highly advisable. To do this, do your best to get in a hinge position and then mentally rotate through the important hinging cues. You can do this without weight or with an unloaded barbell and, if you do it right, you should feel very uncomfortable. Not in injurious pain, but uncomfortable. Practice the hinge until you get comfortable being uncomfortable and you are able to descend from a standing position to a perfect hinge position.
"Alright, weight on the heels? Check. Shins vertical? Check. Low back tucked? I'll try to get a little more. Ouch, my hamstrings! Okay, chest out? Good. Chin tucked? Whoops..."
4. Be able to
"pop" the hips: Essentially, "popping" the hips is going from a hip
hinge position to an upright position by quickly contracting the hip
extensors (the glutes and hamstrings).This explosive hip extension, when
combined with a neutral spine position, is the safest and most powerful
way to lock out a deadlift. Some of you may have no idea what I am
talking about, so let me give you some visuals:
You want to go from A:
To B:
And
you want to go from A to B by throwing your hips into the bar as
powerfully as you possibly can. A lot of high schoolers immediately understand
popping the hips when I tell them, quite simply, "hump the bar once
you get it past your knees." You might notice that, with this method, the bar momentarily loses contact with your legs immediately after it passes your knees. While this goes against the deadlifting principle of always keeping the bar in contact with the body that many coaches preach, I have found that that this disassociation only occurs with sub-maximal weights. Once the reps drop to 1-3 and the RPEs rise to 9-10, the bar remains in contact with the body throughout the lift. This is because, with near-maximal weights, the back tends to round slightly and the shoulder tend to drift forward; this positioning leads to constant contact. However, if you have been practicing popping your hips with sub-maximal weights, you should be able to combine this advantageous constant contact with a very powerful hip extensor-dominant deadlift lockout. If you still don't understand popping the hips, then check out this video of Tony Gentilcore ("Hips through! Hips through!):
Tony's hip pop is pretty stellar.
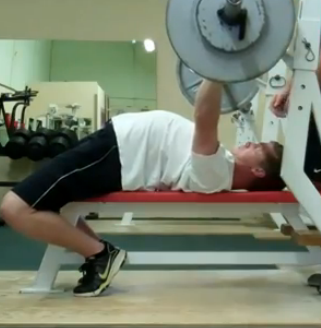
5. Be able to get leg drive when benching: Leg drive is the by-product of an excellent bench press set-up. As my readers have surely realized, a proper bench press set-up can be a lengthy topic. So, to do this point justice, I have to refer you to my bench press set-up article. Read it, practice it, and you will bench more. Why? Because leg drive allows you to achieve maximum stability while pressing. The legs do nothing to lift the weight, but they allow your arms and chest to display the strength that they have. If your leg drive is poor (or non-existent), then be sure to study my bench article and get your leg drive up to snuff.
6. Be
able to walk out a squat efficiently and under control: I always cringe
when I watch a lifter nonchalantly stumble back out of the rack for a
heavy squat. With heavy weights, efficiency becomes increasingly
important. In my bench press article, one of my main points was
consistency; if you want to get good at a lift, make a routine and do it
every single set. When you watch great powerlifters and Olympic
lifters, you will almost always see a distinct routine before each
individual lift. This consistency is no accident; these athletes are
deliberately working towards technical mastery. When I squat, I favor the 3-step walkout that is described in the excellent tutorial video below. Every set I do, I think "back tight, breath, drop-step, stance step, stance step". This consistency has helped me tremendously, and I believe it can benefit every lifter.
7. Be able to
finish a heavy rep on the bench without squirming around: Squirming
around while struggling to lock out a bench press is one of the most
common mistakes I see inexperienced and unskilled lifters make. These
lifters will get to their last rep in a set and, once they get the bar
about half way up and the bar speed slows, they kick their feet and
wiggle their torso in order to finish the rep. For these lifters, this
habit always carries over into their maximum attempts. Instead of being
able to grind a one rep max all the way to lockout, they almost always
get stuck squirming around at that midpoint. The problem with lifting
your feet and squirming around is that you are decreasing your stability
at the time you need it most. The trick is to force yourself to stay
calm when bar speed slows. Experienced lifters learn that staying calm,
staying tight, and focusing on driving the weight all the way up is
vital for successful maximal attempts.
8. Be able to maintain tightness during the big lifts: Squatting, benching, and deadlifting are all about tightness. Allowing certain areas of your body to loosen up during a big lift can decrease your stability, cause you to get out of position, and, ultimately, cause you to miss a lift that your prime movers are more than capable of making. In order to avoid this, you have to focus on certain areas of your body and ensure that they stay locked in throughout the entire lift. The trick is to have these areas in mind before every set and then reinforce them before every single rep you do. For example. before every set and every rep of squats I do, I think "back tight, breath". These two mental cues guarantee that I do not allow my back to loosen up late in my set (which can cause the upper back to round over) and ensure that I am able to transfer the forces generated by my legs up into the bar on my back through a solid midsection. Here is a list of areas to keep tight during each of the three powerlifts:
Squat: Squeeze the upper back, get a big breath while bracing the abdominals and hold that breath.
Bench: Squeeze the shoulder blades together, get a big breath and inflate your stomach, keep your glutes flexed, keep your legs tight by driving your feet down into the floor.
Deadlift: Get a big breath while bracing the abdominals and hold that breath, lock your lats into place by thinking about tucking your shoulder blades "into your back pockets".
Most lifters know these things, but how many actually think about them and force themselves to do them on every rep of every set? It only takes a couple of minutes on Youtube to infer that the answer is "not enough".
Jeremy Frey is the master of tightness.
9. Be
able to do chin-ups through a full range of motion without leg kicking
or swinging: To be honest, this is probably the least important item on
the list; it is more of a pet peeve of mine than a lifting skill.
Performing chin-ups and pull-ups through a full range of motion without
kicking ensures that you reap all of the benefits of this movement. The
top and bottom portions seem to be the most important for improving
scapular function and shoulder health, but most people pump their legs
to get out of the bottom and then fail to pull themselves all the way to
the top. I can let some kicking to get one last heavy rep in slide, but kicking from the start makes the exercise pretty useless. Furthermore, kicking and not using a full range of motion makes it much more difficult to gauge progress. I know that my programming is working when I take individuals from dead-hang-to-chest-touching-the-bar-with-no-leg-kick chin-ups with a band to assist them to doing the exact same thing without the band and a 45-pound plate hanging from their waist. I am not trying to fool my athletes into thinking I got them better, I am actually getting them better. You should do the same with your own lifting; get better, don't fake it.
When it comes to pull-ups, Ben Bruno sets the standard
10. Be
able to un-rack the weight during a bench press and not have to wiggle
around to reposition: Most lifters know that squeezing the shoulder blades together sets a solid foundation for a strong bench press. While the majority of individuals will make sure to squeeze their shoulder blades together during their set-up, they do not focus hard enough on staying tight when un-racking the bar and end up a loose mess by the time they have the bar in the starting position. Rookie benchers will wiggle around under the bar and try to regain their tightness; experienced benchers will rack the bar and start over (if they even run into this problem in the first place). In order to avoid this, you must have a stellar set-up and you must know how to un-rack the bar properly. These points go hand in hand, as a solid un-racking relies on a solid set-up. Start by getting
yourself into a tight, tucked position and make sure that your leg drive
is transferring down into your upper back. Once you have that down,
you have to make sure that you maintain that tight position as you
un-rack the bar. All too often I see lifters go through great pains to
get the perfect set up, only to lose their tightness and stability as
they take the bar out of the rack. I always make sure to keep the phrase
"back tight, legs tight" in mind from the start of my set-up all the way
through to the end of my set. The other thing I do is make sure that
I un-rack the bar with authority. This means that I am squeezing the
bar, deliberately pulling it out with my lats, and guiding it to the
perfect starting position. Loosely wimping the bar off the j-hooks is the perfect start to a terrible set; get tight, take the bar out deliberately, and then smoke the weight. The final tip I can give for a solid un-racking has to do with body positioning. As I alluded to in my bench press article, being too far under or too far away from the bar can make un-racking the bar more difficult than it needs to be. Make sure that you consistently set up in a position that allows you to pull the bar out of the j-hooks with your lats without having to move the bar too far. The distance in the pictures below is how far I move the bar when un-racking it, but note that this varies from person to person depending on their arm length.
I set up so I can go from A...
...to B without losing my tightness.
There you have it; 10 lifting skills to work on in the gym. These skills take time and deliberate practice to master, but so does everything that is worth getting good at. Good luck with your lifting and keep getting stronger! That's what it's all about.
Feel free to leave questions or comments in the comments section below. Also, feel free to contact me at amcgunagle@gmail.com or find me at Andrew McGunagle on Facebook. Thanks for reading!